
Building a Fan Controller with OLED for my Server Rack
 As many of you may know i got myself a Rack Cabinet a few Months ago that is standing in a normal Room i work and life in. Because of that i need to make it as silent as possible so it doesen't annoy me.
I got Four new 140mm Fans for it from Be Quiet! that are very quite even on full RPM. They also can be controlled by PWM, so i made myself a Fan Controller based on an Arduino Nano that also shows the Temperature of the Rack it measures with a DHT22 Sensor on a nice OLED Display. It also uses the Temperature to decide how much the Fan's need to spin, so the noise level is always as low as possible. I did set a Control area between 25 to 30 °C where the Software then Maps the PWM Percentage by Temperature. Over 30° i set the Fans to Full Speed and under 25° it stays at the Minimum of 20%.
I use the Following Rack Plate from DAP Audio for the Modules: DAP Audio 2U 10 Module Plate
You can see somew Details on my Video i made about it (German with English Subtitles):
What you need to Build it
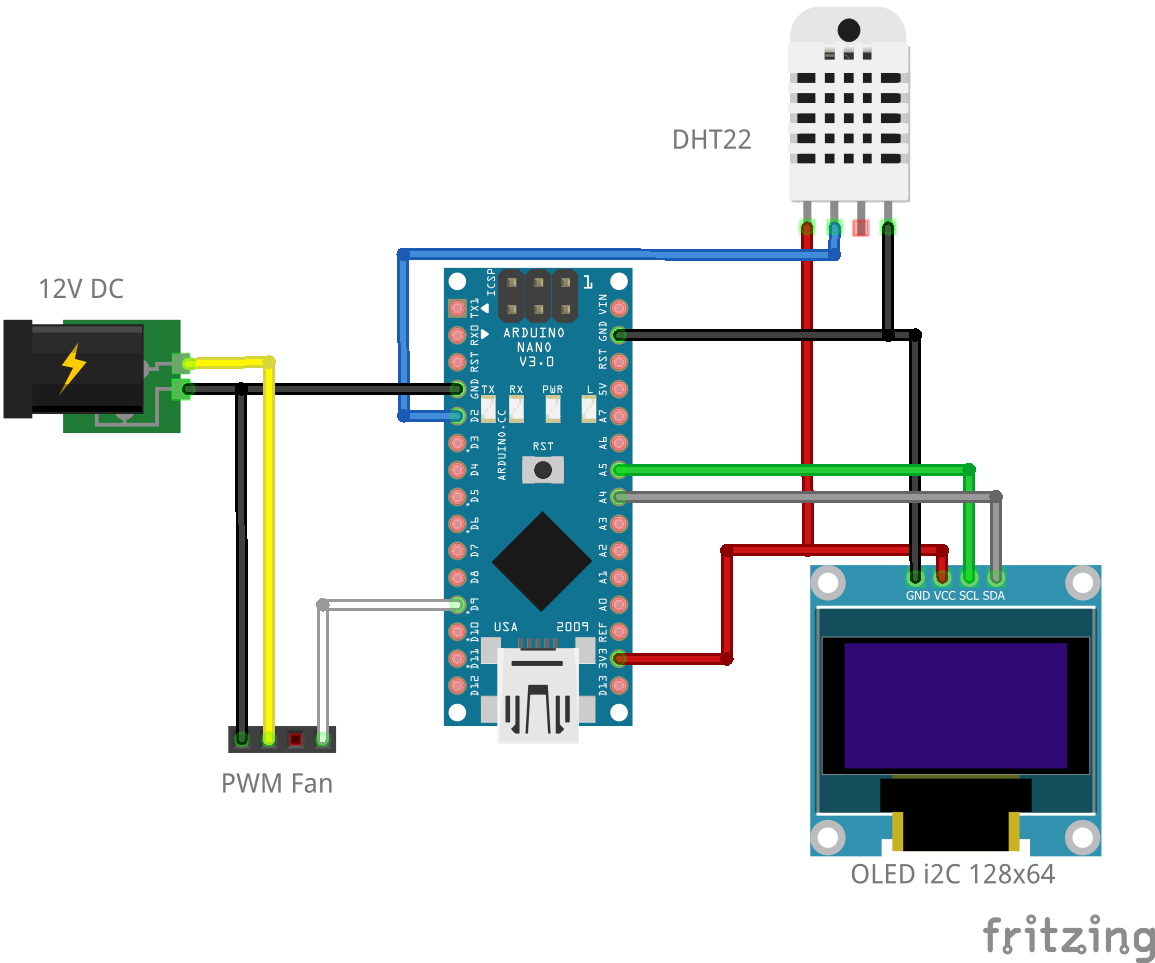
- Arduino Nano (others work, but maybe have other Pinouts)
- I2C OLED DIsplay 128x64px
- DHT22 Sensor
- PWM (4-Pin) Fans
- 12V Power supply (i used one from a old Router with 1.5A)
- 12v Socket (barrel jack comaptible like the PSU i used)
- Pin Headers (for PWM Connection to the Fans)
- Soldering Stuff
- Some Wires etc.
You can Download the Arduino sketch below as well as the 3D printable Controller Mount at the Bottom of the Page. Just follow the Diagramm below and connect everything as described. Then load the Software onto the Arduino and all should work. After that you can glue everything onto the 3D Printed Part and mount everything including the Fans inside your Rack.
Arduino Sketch: Rack_Oled_Fan_Controller.ino
3D Printed parts: Thingiverse
{{ 'Comments (%count%)' | trans {count:count} }}
{{ 'Comments are closed.' | trans }}